

When implementing machine learning (ML) workflows in Amazon SageMaker Canvas, organizations might need to consider external dependencies required for their specific use cases. Although SageMaker Canvas provides powerful no-code and low-code capabilities for rapid experimentation, some projects might require specialized dependencies and libraries that aren’t included by default in SageMaker Canvas. This post provides an example of how to incorporate code that relies on external dependencies into your SageMaker Canvas workflows.
Amazon SageMaker Canvas is a low-code no-code (LCNC) ML platform that guides users through every stage of the ML journey, from initial data preparation to final model deployment. Without writing a single line of code, users can explore datasets, transform data, build models, and generate predictions.
SageMaker Canvas offers comprehensive data wrangling capabilities that help you prepare your data, including:
- Over 300 built-in transformation steps
- Feature engineering capabilities
- Data normalization and cleansing functions
- A custom code editor supporting Python, PySpark, and SparkSQL
In this post, we demonstrate how to incorporate dependencies stored in Amazon Simple Storage Service (Amazon S3) within an Amazon SageMaker Data Wrangler flow. Using this approach, you can run custom scripts that depend on modules not inherently supported by SageMaker Canvas.
Solution overview
To showcase the integration of custom scripts and dependencies from Amazon S3 into SageMaker Canvas, we explore the following example workflow.
The solution follows three main steps:
- Upload custom scripts and dependencies to Amazon S3
- Use SageMaker Data Wrangler in SageMaker Canvas to transform your data using the uploaded code
- Train and export the model
The following diagram is the architecture for the solution.
In this example, we work with two complementary datasets available in SageMaker Canvas that contain shipping information for computer screen deliveries. By joining these datasets, we create a comprehensive dataset that captures various shipping metrics and delivery outcomes. Our goal is to build a predictive model that can determine whether future shipments will arrive on time based on historical shipping patterns and characteristics.
Prerequisites
As a prerequisite, you need access to Amazon S3 and Amazon SageMaker AI. If you don’t already have a SageMaker AI domain configured in your account, you also need permissions to create a SageMaker AI domain.
Create the data flow
To create the data flow, follow these steps:
- On the Amazon SageMaker AI console, in the navigation pane, under Applications and IDEs, select Canvas, as shown in the following screenshot. You might need to create a SageMaker domain if you haven’t done so already.
- After your domain is created, choose Open Canvas.

- In Canvas, select the Datasets tab and select canvas-sample-shipping-logs.csv, as shown in the following screenshot. After the preview appears, choose + Create a data flow.

The initial data flow will open with one source and one data type.
- At the top right of the screen, and select Add data → tabular. Choose Canvas Datasets as the source and select canvas-sample-product-descriptions.csv.
- Choose Next as shown in the following screenshot. Then choose Import.

- After both datasets have been added, select the plus sign. From the dropdown menu, choose select Combine data. From the next dropdown menu, choose Join.

- To perform an inner join on the ProductID column, in the right-hand menu, under Join type, choose Inner join. Under Join keys, choose ProductId, as shown in the following screenshot.

- After the datasets have been joined, select the plus sign. In the dropdown menu, select + Add transform. A preview of the dataset will open.
The dataset contains XShippingDistance (long) and YShippingDistance (long) columns. For our purposes, we want to use a custom function that will find the total distance using the X and Y coordinates and then drop the individual coordinate columns. For this example, we find the total distance using a function that relies on the mpmath library.
- To call the custom function, select + Add transform. In the dropdown menu, select Custom transform. Change the editor to Python (Pandas) and try to run the following function from the Python editor:
Running the function produces the following error: ModuleNotFoundError: No module named ‘mpmath’, as shown in the following screenshot.

This error occurs because mpmath isn’t a module that is inherently supported by SageMaker Canvas. To use a function that relies on this module, we need to approach the use of a custom function differently.
Zip the script and dependencies
To use a function that relies on a module that isn’t natively supported in Canvas, the custom script must be zipped with the module(s) it relies on. For this example, we used our local integrated development environment (IDE) to create a script.py that relies on the mpmath library.
The script.py file contains two functions: one function that is compatible with the Python (Pandas) runtime (function calculate_total_distance), and one that is compatible with the Python (Pyspark) runtime (function udf_total_distance).
To make sure the script can run, install mpmath into the same directory as script.py by running pip install mpmath.
Run zip -r my_project.zip to create a .zip file containing the function and the mpmath installation. The current directory now contains a .zip file, our Python script, and the installation our script depends on, as shown in the following screenshot.

Upload to Amazon S3
After creating the .zip file, upload it to an Amazon S3 bucket.

After the zip file has been uploaded to Amazon S3, it’s accessible in SageMaker Canvas.
Run the custom script
Return to the data flow in SageMaker Canvas and replace the prior custom function code with the following code and choose Update.
This example code unzips the .zip file and adds the required dependencies to the local path so they’re available to the function at run time. Because mpmath was added to the local path, you can now call a function that relies on this external library.
The preceding code runs using the Python (Pandas) runtime and calculate_total_distance function. To use the Python (Pyspark) runtime, update the function_name variable to call the udf_total_distance function instead.
Complete the data flow
As a last step, remove irrelevant columns before training the model. Follow these steps:
- On the SageMaker Canvas console, select + Add transform. From the dropdown menu, select Manage columns
- Under Transform, choose Drop column. Under Columns to drop, add ProductId_0, ProductId_1, and OrderID, as shown in the following screenshot.

The final dataset should contain 13 columns. The complete data flow is pictured in the following image.

Train the model
To train the model, follow these steps:
- At the top right of the page, select Create model and name your dataset and model.
- Select Predictive analysis as the problem type and OnTimeDelivery as the target column, as shown in the screenshot below.
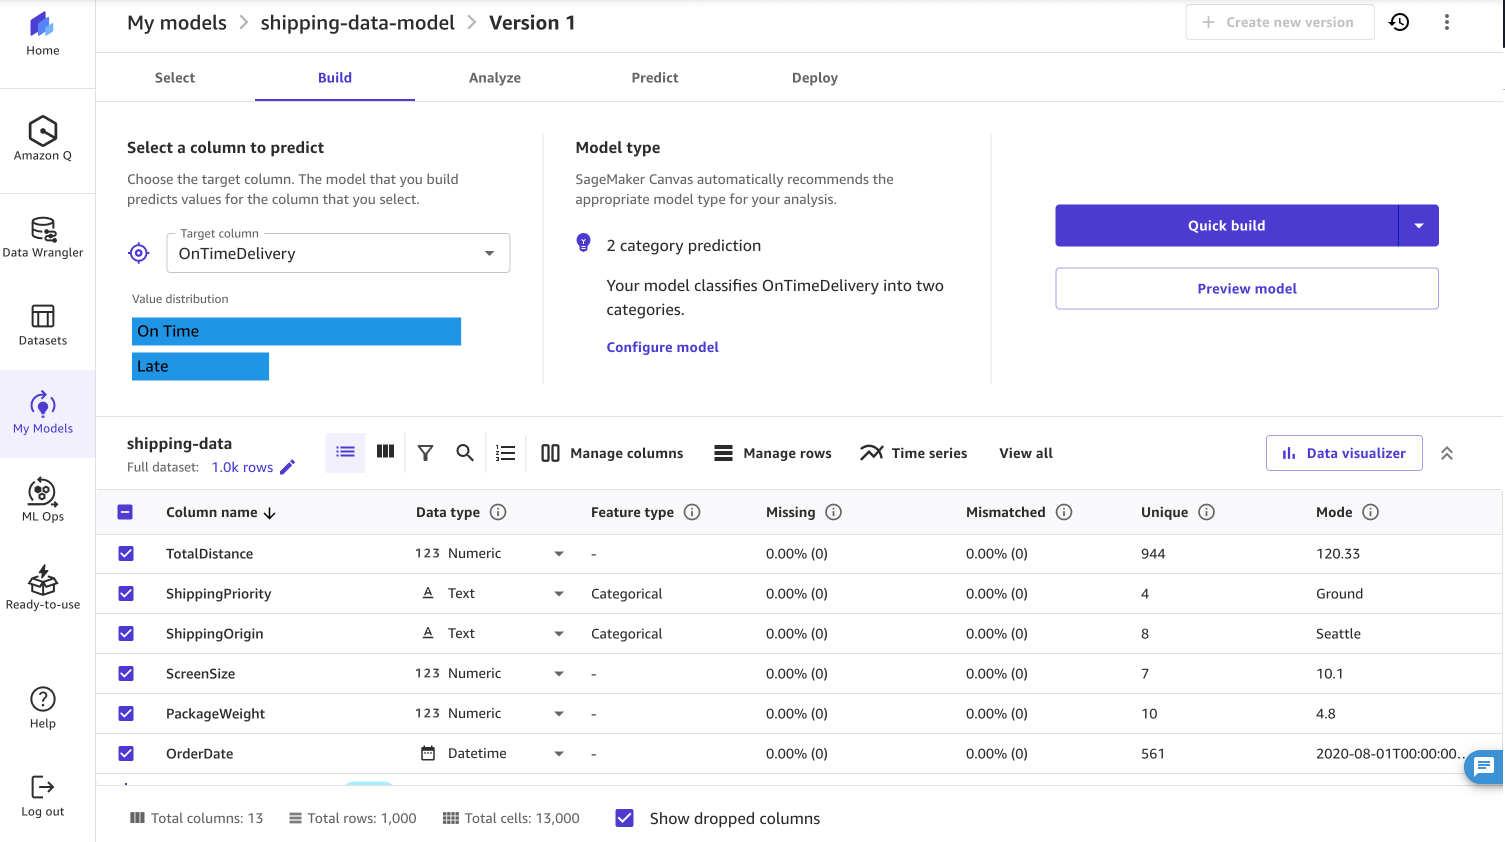
When building the model you can choose to run a Quick build or a Standard build. A Quick build prioritizes speed over accuracy and produces a trained model in less than 20 minutes. A standard build prioritizes accuracy over latency but the model takes longer to train.
Results
After the model build is complete, you can view the model’s accuracy, along with metrics like F1, precision and recall. In the case of a standard build, the model achieved 94.5% accuracy.

After the model training is complete, there are four ways you can use your model:
- Deploy the model directly from SageMaker Canvas to an endpoint
- Add the model to the SageMaker Model Registry
- Export your model to a Jupyter Notebook
- Send your model to Amazon QuickSight for use in dashboard visualizations
Clean up
To manage costs and prevent additional workspace charges, choose Log out to sign out of SageMaker Canvas when you’re done using the application, as shown in the following screenshot. You can also configure SageMaker Canvas to automatically shut down when idle.
If you created an S3 bucket specifically for this example, you might also want to empty and delete your bucket.

Summary
In this post, we demonstrated how you can upload custom dependencies to Amazon S3 and integrate them into SageMaker Canvas workflows. By walking through a practical example of implementing a custom distance calculation function with the mpmath library, we showed how to:
- Package custom code and dependencies into a .zip file
- Store and access these dependencies from Amazon S3
- Implement custom data transformations in SageMaker Data Wrangler
- Train a predictive model using the transformed data
This approach means that data scientists and analysts can extend SageMaker Canvas capabilities beyond the more than 300 included functions.
To try custom transforms yourself, refer to the Amazon SageMaker Canvas documentation and sign in to SageMaker Canvas today. For additional insights into how you can optimize your SageMaker Canvas implementation, we recommend exploring these related posts:
About the Author
 Nadhya Polanco is an Associate Solutions Architect at AWS based in Brussels, Belgium. In this role, she supports organizations looking to incorporate AI and Machine Learning into their workloads. In her free time, Nadhya enjoys indulging in her passion for coffee and exploring new destinations.